Rendering
Rendering defines the way of drawing elements. It also describes how to handle transparency and pre-/post effects. With 0.8.3+ major changes in rendering were introduced. To handle complexicity of WBOIT rendering (Weighted Blended Order Independent Transparency Rendering) the new TRenderer class was implemented. It allows to manage context, framebuffers, textures and blendings separately for main-loop and render-passes. The viewport and each render-pass controller will hold a TRenderer component.
The TRenderer is planned to support deferred-rendering in future, but at the moment only the forward-renderer and legacy-rendering is available.
Forward-Renderer
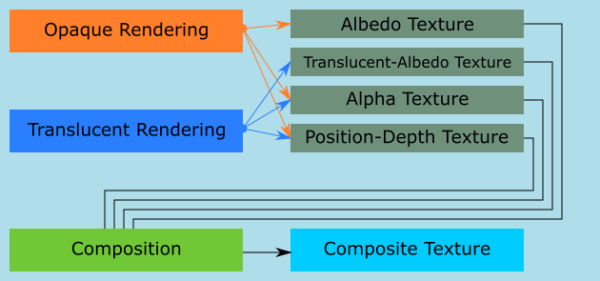
The following schema shows the default WBOIT rendering steps with meta-textures and composition, used by the forward-renderer. Those steps are used for main-loop rendering.
We've kept the flexibility to edit the TRenderer instance regarding your needs. Because in some cases you don't need all kind of textures or the complete WBOIT rendering steps.
For example:
- A depth render pass only needs to render all objects straight, without caring about transparency, and only needs a single texture to write depth values to. So we disable all unneeded textures and steps.
- A bokeh post processing effect renders only a rectangle and merges input textures from depth-pass and mainloop.
The following example shows a scene setup for rendering bokeh post-processing effect with a depth pre-rendering:
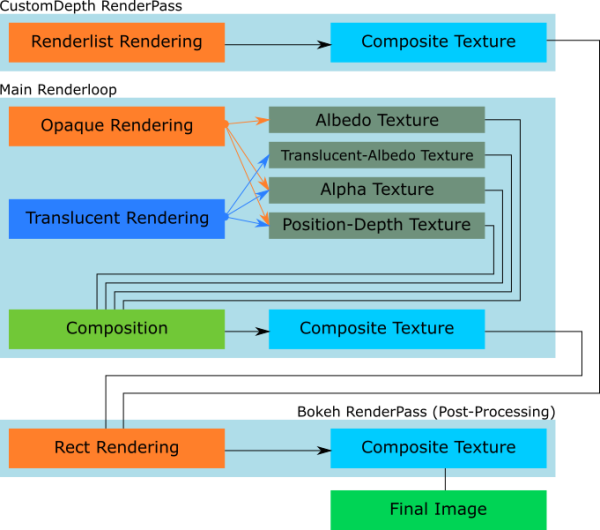
Steps:
- All objects are rendered and their depth value is written to a texture
- Main-Loop rendering:
- All opaque objects are rendered
- All translucent objects are rendered
- opaque and translucent rendering merged into a composite texture
- Only a rectangle (in viewport size) is rendered: results from depth and main-loop are merged to produce a blur effect
- The final image will be taken from the post-processing render-pass composite texture
Render Targets
Opaque, translucent rendering and compositing is separated into different steps as seen above. Therefore are used different render target textures to store the information of each step.
The implemented texture formats are platform dependent. On Windows we're using BGRA format, while on other platforms RGBA is used for colored textures. (Due to FMX default).
1) Global textures for all steps
| Texture-ID | Format | InternalFormat | DataType |
|---|---|---|---|
| Alpha Texture | Alpha | R16F | HalfFloat |
| Position-Depth Texture | RGBA | RGBA16F | HalfFloat |
2) Additional opaque texture
| Texture-ID | Format | InternalFormat | DataType |
|---|---|---|---|
| Albedo Texture | BGRA (Windows) / RGBA | RGBA8 | UnsignedByte |
3) Additional translucent texture
| Texture-ID | Format | InternalFormat | DataType |
|---|---|---|---|
| Translucent-Albedo Texture | BGRA (Windows) / RGBA | RGBA16F | HalfFloat |
Caution: Color stored in translucent albedo texture is weighted and not the original color!
4) Composite texture / final output texture
| Texture-ID | Format | InternalFormat | DataType |
|---|---|---|---|
| Composite Texture | BGRA (Windows) / RGBA | RGBA8 | UnsignedByte |
This texture will be filled by an embedded composite render-pass, which combines opaque and translucent albedo textures.
Legacy-Renderer
The legacy rendering comes in place, when users want to control rendering themselves.
Take care:
- It provides no helper functionality at all, given by the forward renderer
- It only sets up a default framebuffer object with a single render target texture
- Transparency is no longer automatically handled - may produce fragments or incorrect values
- Gorilla3D default materials will no longer work properly!
- FMX / Gorilla3D still modify context state settings for blending, coloring, depth-testing, …
What you can do:
- You can use simple Firemonkey materials (TColorMaterialSource, TLightMaterialSource or TTextureMaterialSource)
- You can render by native OpenGL commands (glBegin, glEnd, glColor4f, glVertex3f, …)
Render-Target
Legacy rendering provides only a single composite texture / final output texture for you.
| Texture-ID | Format | InternalFormat | DataType |
|---|---|---|---|
| Composite Texture | BGRA (Windows) / RGBA | RGBA8 | UnsignedByte |
How to use
Since v0.8.3.1778 Gorilla3D allows to switch to legacy renderer by viewport property.
uses
  Gorilla.Renderer;

[...]
GorillaViewport1.RendererType := TRendererType.LegacyRenderer;
Rendering
When activating legacy rendering it doesn't change the element rendering itself. It will not perform any object sorting in distance to the camera. Instead it renders opague-marked elements at first and then all other elements.
Opaque rendering will be performed without blending, while for “translucent” rendering blending will be activated.
Compatibility with Render-Pass
The core mechanism of render-pass handling is still available, but it might influence your final result, when using forward and legacy renderer inconsistently. Read more about render-passes in the following sections.
You can activate legacy rendering for render-passes like in the following snippet:
uses
  Gorilla.Renderer;

[...]

constructor TMyRenderPass.Create(AOwner : TComponent;
  const AId : String = 'MyRenderPass1');
begin
  inherited;

  RendererType := TRendererType.LegacyRenderer;
end;
Render-Pass
In the simplest rendering pipeline you have one rendering loop, where all scene elements are drawn. But in many cases you need additional steps before or after the main loop to produce the visual result you want. An example is a shadow mapping pre-rendering or a post-rendering blur effect.
With Gorilla3D it is possible to easily setup your own rendering pipeline. As mentioned the moment of execution is important. You can choose between 3 different moments of rendering:
| Type | Description |
|---|---|
| TRenderPassType.Pre | render-pass will be executed before main loop. |
| TRenderPassType.Intermediate | render-pass will be executed in between main loop (not recommended - very ineffective - because executed each renderlist element) |
| TRenderPassType.Post | render-pass will be executed after main loop. |
FType := TRenderPassType.Pre;
Rendering Method
The render-pass controller allows to configure the method of rendering:
- RenderListToFBO
- RectToFBO
Elder methods: RenderListToContext and RectToContext were removed while pipeline refactoring.
| Type | Description |
|---|---|
| TRenderPassMethod.RenderListToFBO | Will render all 3D objects in rendering list and writes result to the currently bound framebuffer object. |
| TRenderPassMethod.RectToFBO | Will render a rectangle with an applied shader material. Use this method to produce pre- or post-effects. |
FMethod := TRenderPassMethod.RenderListToFBO;
The framebuffer object (FBO) is a structure inside of each render-pass and the main-loop. (Or better to say: A structure in each context of a TRenderer).
Render results are stored into that buffers. This allows to forward results from one step to another.
Rendering Procedure
Because it's not enough to tell the renderer what and where to render, we need to define a way of rendering. Therefore the render-pass controller supplies a property FRenderProc. Currently there are 2 ways defined:
- DefaultRendering
- ListRendering
| Type | Description |
|---|---|
| TRenderPassRenderingProc.DefaultRendering | Uses the complete WBOIT rendering with stepwise rendering of opaque, translucent and composition. |
| TRenderPassRenderingProc.ListRendering | Renders all objects straight forward without caring about transparency or order. |
FRenderProc := TRenderPassRenderingProc.ListRendering;
Change Renderer Settings
Each render-pass creates a TRenderer instance by default and every renderer holds a context which manages framebuffer objects. Those framebuffer objects allow us to setup render targets.
Read more about Framebuffer Objects (FBO).
The render-pass provides a protected method to react on renderer creation.
procedure TMyRenderPass.DoCreateRenderer();
begin
  inherited;

  // in case you only want to use the color attachment #0
  FRenderer.RenderTargets := [TRenderTarget.Color_0];
end;
To influence creation process you can alternatively configure options inside the render-pass.
| Flag | Description |
|---|---|
| TRendererFlag.IgnoreRenderTargets | Will not create any of the meta-textures (Albedo, TranslucentAlbedo, Alpha, Position), but will create the final composite texture of BGRA (Windows) / RGBA format. |
| TRendererFlag.IgnoreCompositeCtrl | Will not create the embedded composite render pass to merge meta-textures. |
Hint: use both flags if you only want to work with the composite texture.
constructor TMyRenderPass.Create(AOwner : TComponent;
  const AId : String = 'MyRenderPass1');
begin
  inherited Create(AOwner, AId);

  FRendererFlags := [TRendererFlag.IgnoreRenderTargets, TRendererFlag.IgnoreCompositeCtrl];
  [...]
end;
By renderer flags you are able to control meta texture creation, but not the final output texture format. To change the output format (default = RGBA8) you can override the protected “DoOnCreateCompositeTexture” method.
procedure TMyRenderPass.DoOnCreateCompositeTexture(
  ASender : TObject; const ASize : TPoint; const AScale : Single;
  out ATexture : TGorillaTextureBitmap);
var LTexRef : TTexture;
begin
  ATexture := TGorillaTextureBitmap.Create();
  ATexture.BeginSetup();
  try
    ATexture.Style := [TTextureStyle.RenderTarget];
    ATexture.SetSize(ASize.X, ASize.Y);
    ATexture.BitmapScale := AScale;

    // here we define a texture with only 1 color channel and a 16-bit float value.
    ATexture.DataType := TGorillaTextureDataType.dtHalfFloat;
    ATexture.Components := TPixelFormatEx.R16F;
    ATexture.Format := TPixelFormatEx.R;
    ATexture.MinFilter := TTextureFilter.Linear;
    ATexture.MagFilter := TTextureFilter.Linear;
    ATexture.WrapS := TGorillaTextureWrap.ClampToBorder;
    ATexture.WrapT := TGorillaTextureWrap.ClampToBorder;
    ATexture.Style := [TTextureStyle.MipMaps];
    ATexture.BorderColor := TAlphaColorF.Create(1, 1, 1, 1);
  finally
    ATexture.EndSetup();
  end;

  // return a texture reference and set scaling
  LTexRef := ATexture.Texture;
  ITextureAccess(LTexRef).TextureScale := AScale;
end;
Shader / Render-Pass Material
In next step you have to decide which shader material should be used by the render-pass:
1) For RenderListToFBO rendering:
- Create a global material shader for all objects and override the object-specific shaders (f.e. depth value rendering)
- Use the object-specific shaders, by returning NIL in the CreateMaterial() method (f.e. reflection rendering)
2) For RectToFBO rendering:
- Create a global material shader (f.e. blur post-effect)
To create an global material shader for your render-pass you need to extend TGorillaRenderPassMaterialSource and TGorillaRenderPassMaterial.
uses
  FMX.Types3D,
  FMX.Materials,
  FMX.MaterialSources,
  Gorilla.Controller;

  TMyRenderPassMaterial = class(TGorillaRenderPassMaterial)
    protected
      procedure DoApply(const Context: TContext3D); override;
      procedure DoInitialize(); override;
    public
  end;

  TMyRenderPassMaterialSource = class(TGorillaRenderPassMaterialSource)
    protected
      function CreateMaterial() : TMaterial; override;
    public
  end;
Here you can have a look at this example of a render-pass material implementation.
Notice: No multiple targets used here. We just write to default output buffer by gl_FragColor.
uses
  Gorilla.Context.GLES;

  ResourceString SOURCE_VS =
    'attribute vec3 a_Position;' +
    '' +
    'uniform mat4 _ModelViewProjMatrix;' +
    '' +
    'varying vec4 v_position;' +
    '' +
    'void main( void ){' +
    '  vec4 fvPosition = vec4(a_Position.x, a_Position.y, a_Position.z, 1.0);' +
    '  v_position = _ModelViewProjMatrix * fvPosition;' +
    '  gl_Position = v_position;' +
    '}';

  ResourceString SOURCE_FS =
    'varying vec4 v_position;' +
    '' +
    'void main( void ){' +
    '  gl_FragColor = v_position;' +
    '}';

procedure TMyRenderPassMaterial.DoInitialize();
var LOGLBytes : TArray<Byte>;
begin
  LOGLBytes := TEncoding.ASCII.GetBytes(SOURCE_VS);
  FVertexShader := TShaderManager.RegisterShaderFromData('MyRenderPass.fvs', TContextShaderKind.VertexShader, '', [
    TContextShaderSource.Create(TContextShaderArch.GLSL,
      LOGLBytes,
      [
      TContextShaderVariable.Create('ModelViewProjMatrix', TContextShaderVariableKind.Matrix, 0, 4)
      ]
    )
  ]);

  LOGLBytes := TEncoding.ASCII.GetBytes(SOURCE_FS);
  FPixelShader := TShaderManager.RegisterShaderFromData('MyRenderPass.fps', TContextShaderKind.PixelShader, '', [
    TContextShaderSource.Create(TContextShaderArch.GLSL,
      LOGLBytes,
      []
    )
  ]);
end;

{ TMyRenderPassMaterial }

procedure TMyRenderPassMaterial.DoApply(const Context: TContext3D);
begin
  // activate shaders
  Context.SetShaders(FVertexShader, FPixelShader);
  // set model view projection matrix
  TCustomContextOpenGL(Context).SetShaderVariable('ModelViewProjMatrix', Context.CurrentModelViewProjectionMatrix, true);
end;

{ TMyRenderPassMaterialSource }

function TMyRenderPassMaterialSource.CreateMaterial() : TMaterial;
begin
  Result := TMyRenderPassMaterial.Create(Self);
end;
You than have to overwrite the CreateMaterialSource() method and create your material source. In case you'd like to use the element specific material shaders, return nil in the CreateMaterialSource() method.
function TMyRenderPass.CreateMaterialSource() : TGorillaRenderPassMaterialSource;
begin
  result := TMyRenderPassMaterialSource.Create(Self);
end;
Start / End
The render-pass controller provides callback events for the start and the end of each rendering cycle. Simply overwrite the protected “DoOnBeginRenderPassSetup” and “DoOnEndRenderPassSetup” methods.
Here you can change the view, projection matrices or re-configure OpenGL context. But do not forget to reset your changes in “DoOnEndRenderPassSetup”, otherwise the main loop rendering may produce unexpected results.
Here is a short example for callback functions.
procedure TMyRenderPass.DoOnBeginRenderPassSetup(
  const ACount : Integer; const APass : TRenderPass);
var LCtx : TCustomContextOpenGL;
begin
  inherited;

  LCtx := (FRenderer.SharedContext as TCustomContextOpenGL);
  FPrevBlends := LCtx.Blendings;

  LCtx.Blending := TBlendSetting.Create(true, TBlendEquationFunc.befAdd,
    TBlendFactor.bfOneMinusSrcColor, TBlendFactor.bfDstColor);
end;

procedure TMyRenderPass.DoOnEndRenderPassSetup(
  const ACount : Integer; const APass : TRenderPass);
var LCtx : TCustomContextOpenGL;
begin
  LCtx := (FRenderer.SharedContext as TCustomContextOpenGL);
  LCtx.Blendings := FPrevBlends;

  inherited;
end;
Iterations
The callback also provides an “ACount” value, which indicates the iteration count for this render-pass. It is possible to set a number of iterations this pass should run. This is very useful for ping-pong rendering techniques like blurring.
Set the “Iterations” property in your render-pass constructor to define the number of iterations. The DoOnRenderPass() method will be called on each iteration step.
Helpful methods
To use a different camera view or change to another projection mode, overwrite the following methods:
- function GetViewMatrix(const AContext : TContext3D) : TMatrix3D;
- function GetProjectionMatrix(const AContext : TContext3D) : TMatrix3D;
How to use
Using your own render pass is very easy. Just instanciate it and attach the viewport to it. This will automatically integrate your render-pass in the rendering-pipeline. By the “Enabled” property you can activate or deactivate it at any time.
FMyRenderPass := TMyRenderPass.Create(FGorilla);
FMyRenderPass.Viewport := FGorilla;
FMyRenderPass.Enabled := true;
Next step: Shadows