Materials
A core feature of Gorilla3D is a set of standard materials for easy and quick usage in your project.
Since version 0.8+, the most materials are inherited from the node based TGorillaDefaultMaterialSource for comfortable shader code reusage.
Default-Material
The TGorillaDefaultMaterialSource (TGorillaDefaultMaterial) is the approach to centralize basic shader operations like vertex transformation, multiple light computation, shadow casting, normal mapping and much more.
The simple reason for that is, not to reinvent the basic functionality each time for new materials. Many materials need multiple lights, shadows and so one. Those operations also getting very complex in combination and its hard to keep them still efficient.
Because of that, the default material uses a node based memory structure to build shader source code. On rendering the source code will automatically be compiled and registered in GPU.
Read more about the default material: DefaultMaterial
Vertex-Material
The TGorillaVertexMaterialSource (TGorillaVertexMaterial) is inherited from TGorillaDefaultMaterial, supports multiple light sources, different shading models (lambert, phong, blinn-phong) and produces the output-color depending on the Color0-attribute of each vertex.
If your mesh data do not provide the color information in the vertex, the shader will produce a black output.
Lambert-Material
The TGorillaLambertMaterialSource (TGorillaLambertMaterial) is inherited from the TGorillaDefaultMaterialSource and supports multiple light sources and the lambert shading model.
Lambertian reflectance is the property that defines an ideal “matte” or diffusely reflecting surface. The apparent brightness of a Lambertian surface to an observer is the same regardless of the observer's angle of view.
More technically, the surface's luminance is isotropic, and the luminous intensity obeys Lambert's cosine law. Lambertian reflectance is named after Johann Heinrich Lambert, who introduced the concept of perfect diffusion in his 1760 book Photometria. The material allows to configure used color channels: all-colors, only-ambient, only-diffuse, only-specular.
Phong-Material
The TGorillaPhongMaterialSource (TGorillaPhongMaterial) is inherited from the TGorillaDefaultMaterialSource and supports multiple light sources and the phong shading model.
Phong shading refers to an interpolation technique for surface shading in 3D computer graphics. It is also called Phong interpolation or normal-vector interpolation shading. Specifically, it interpolates surface normals across rasterized polygons and computes pixel colors based on the interpolated normals and a reflection model.
BlinnPhong-Material
The TGorillaBlinnMaterialSource (TGorillaBlinnMaterial) is inherited from the TGorillaDefaultMaterialSource and supports multiple light sources and the blinn-phong shading model.
The Blinn–Phong reflection model (also called the modified Phong reflection model) is a modification to the Phong reflection model developed by Jim Blinn.
Blinn–Phong is the default shading model used in OpenGL and Direct3D's fixed-function pipeline (before Direct3D 10 and OpenGL 3.1), and is carried out on each vertex as it passes down the graphics pipeline; pixel values between vertices are interpolated by Gouraud shading by default, rather than the more computationally-expensive Phong shading.
Normalmap-Material
The TGorillaNormalMapMaterialSource (TGorillaNormalMapMaterial) is inherited from TGorillaDefaultMaterialSource, supports multiple light sources and enables normal mapping functionality in vertex- and fragmentshader: GORILLA_GLSL_DEFINE_NORMALMAP
In 3D computer graphics, normal mapping (or Dot3 bump mapping) is a technique used for faking the lighting of bumps and dents – an implementation of bump mapping. It is used to add details without using more polygons. A common use of this technique is to greatly enhance the appearance and details of a low polygon model by generating a normal map from a high polygon model or height map.
Normal maps are commonly stored as regular RGB images where the RGB components correspond to the X, Y, and Z coordinates, respectively, of the surface normal.
[source: https://en.wikipedia.org/wiki/Normal_mapping]
The shading model configured by default is the Blinn-Phong algorithm.
Using this material source will provide a new published property called NormalMap. It also supplies the optional DisplacementMap property to apply a vertex manipulation texture.
Bumpmap-Material
The TGorillaBumpMapMaterialSource (TGorillaBumpMapMaterial) is inherited from the TGorillaNormalMapMaterialSource, supports multiple light sources and extends normal-mapping functionality by a specular texture map for better specular color results by: GORILLA_GLSL_DEFINE_BUMP
Hint: Due to historical development of Gorilla3D this is called BumpMap-Material, even if this terminologically not fully correct.
By this material a new SpecularMap texture property is provided.
SplatMap-Material
The TGorillaSplatMapMaterialSource (TGorillaSplatMapMaterial) is inherited from TGorillaDefaultMaterialSource, supports multiple light sources and enables splatmap functionality by: GORILLA_GLSL_DEFINE_SPLATMAP
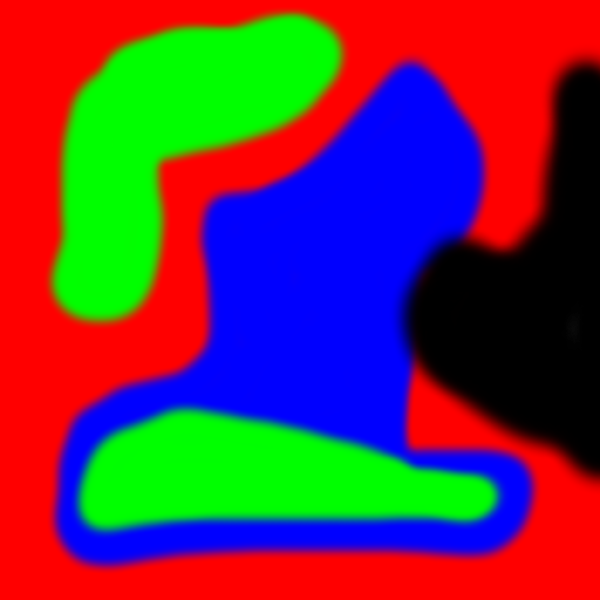
A splatmap texture is kind of a map at which position to draw which texture.

A splatmap texture provides the RGB-channels. Each channel is used for a splat-texture. In words: Red, Blue, Green and Black stand for a specific splat-texture. Because of that the material allows 4 textures at maximum.
Example:
R = 0.5, G = 0.5, B = 0.0, A = 1.0
This will blend SplatTexture0 and SplatTexture1 at 50%.

R = 0.0, G = 0.0, B = 1.0, A = 1.0
This will only show SplatTexture2 at 100%.
You can combine splatmap materials in a TGorillaLayeredMaterialSource to use more than 4 textures. The condition is, to use transparent areas in the splatmap. Overlaying multiple splatmap materials will produce a final result.
To enable a splatmap material for transparent areas, you'll need to set “UseBlackAsTransparent” property to true.
Caution: This will reduce the number of textures per splatmap to a maximum of 3.
Terrain-Material
The TGorillaTerrainMaterialSource (TGorillaTerrainMaterial) is inherited from the TGorillaDefaultMaterialSource, supports multiple lights and enables texturing by height information: GORILLA_GLSL_DEFINE_TERRAINMAP

It works by defining a height range and which texture to use. To allow texture overlapping, you can configure transition for each level.
The material provides a texture bitmap pool (TCollection) where you can simply add your height levels and the texture to be used.
We create a height level by Bitmaps.Add() function and retrieve a new TGorillaTerrainBitmap instance with a few properties to be set:
| Property | Notice |
|---|---|
| DisplayName | A required texture name. |
| MinHeight | The lower limit value, depending on the untransformed mesh vertex position. |
| MaxHeight | The upper limit value, depending on the untransformed mesh vertex position. |
| LowTransition | A transition value at the lower limit for blending transitions between textures. |
| HighTransition | A transition value at the upper limit for blending transitions between textures. |
| Tiling | A texture tiling for multiplying the specific texture. |
| Bitmap | Loading the texture data itself. |
var LTerrMat : TGorillaTerrainMaterialSource;
    LTerrBmp : TGorillaTerrainBitmap;

[...]

  LTerrMat := TGorillaTerrainMaterialSource.Create(fTerrain);
  LTerrMat.Parent := FTerrain;
  with LTerrMat do
  begin
    // height level 1
    LTerrBmp := Bitmaps.Add() as TGorillaTerrainBitmap;
    LTerrBmp.DisplayName := 'TerrainTexture0';
    LTerrBmp.MinHeight := +0.1;
    LTerrBmp.MaxHeight := -0.5;
    LTerrBmp.LowTransition := 0.25;
    LTerrBmp.HighTransition := 0.25;
    LTerrBmp.Tiling := TPointF.Create(32, 32);
    LTerrBmp.Bitmap.LoadFromFile('terrain-1.jpg');

    // height level 2
    LTerrBmp:= Bitmaps.Add() as TGorillaTerrainBitmap;
    LTerrBmp.DisplayName := 'TerrainTexture1';
    LTerrBmp.MinHeight := -0.5;
    LTerrBmp.MaxHeight := -1.0;
    LTerrBmp.LowTransition := 0.25;
    LTerrBmp.HighTransition := 0.25;
    LTerrBmp.Tiling := TPointF.Create(32, 32);
    LTerrBmp.Bitmap.LoadFromFile('terrain-2.jpg');

    // height level 3
    LTerrBmp:= Bitmaps.Add() as TGorillaTerrainBitmap;
    LTerrBmp.DisplayName := 'TerrainTexture2';
    LTerrBmp.MinHeight := -1.0;
    LTerrBmp.MaxHeight := -2.0;
    LTerrBmp.LowTransition := 0.25;
    LTerrBmp.HighTransition := 0.25;
    LTerrBmp.Tiling := TPointF.Create(32, 32);
    LTerrBmp.Bitmap.LoadFromFile('terrain-3.jpg');

    // height level 4
    LTerrBmp:= Bitmaps.Add() as TGorillaTerrainBitmap;
    LTerrBmp.DisplayName := 'TerrainTexture3';
    LTerrBmp.MinHeight := -2.0;
    LTerrBmp.MaxHeight := -FTerrain.HeightScale - 0.1;
    LTerrBmp.LowTransition := 0.25;
    LTerrBmp.HighTransition := 0.25;
    LTerrBmp.Tiling := TPointF.Create(32, 32);
    LTerrBmp.Bitmap.LoadFromFile('terrain-4.jpg');
  end;
Lower and upper limits
The texture selection in the material shader depends on the untransformed mesh vertex position on y-axis (GLSL: “vars.v_VertPos.y”). So MinHeight and MaxHeight values should range between 0.0 and -FTerrain.HeightScale including a tolerance of +/-0.1.
For example:
1) Dividing a terrain in 3 equal height-levels at a terrain height scale of 1.0 means:
| Level | MinHeight | MaxHeight |
|---|---|---|
| Level 1 | 0.0 [+ 0.1] | -0.33 |
| Level 2 | -0.33 | -0.66 |
| Level 3 | -0.66 | -1.0 [-0.1] |
2) Dividing a terrain in 3 equal height-levels at a terrain height scale of 2.0 means:
| Level | MinHeight | MaxHeight |
|---|---|---|
| Level 1 | 0.0 [+ 0.1] | -0.66 |
| Level 2 | -0.66 | -1.33 |
| Level 3 | -1.33 | -2.0 [-0.1] |
Lower and upper transition
Transition values are useful for overlapping / blending textures to simulate a more realistic terrain texture. Like the lower and upper limit values, transitions also depend on the untransformed mesh vertex position. So LowTransition and HighTransition values should range between 0.0 and -FTerrain.HeightScale, too.
Particle-Material
The TGorillaParticleMaterialSource (TGorillaParticleMaterial) is inherited from TGorillaDefaultMaterialSource, supports multiple light sources and enables texture atlas and point-sprite handling if activated: GORILLA_GLSL_DEFINE_USE_TEXTURE_ATLAS, GORILLA_GLSL_DEFINE_USE_POINTSPRITE
Depending on the material configuration it enables different rendering techniques:
| Mode | UseTexture | IsTextureAtlas | Technique |
|---|---|---|---|
| OnlyColor | false | false | Renders each particle with the provided color information and without texturing |
| Texturing | true | false | Renders each particle with the provided texture but without atlas mapping |
| Atlas-Texturing | true | true | Renders each particle with the provided texture-atlas |
Texture-Atlas
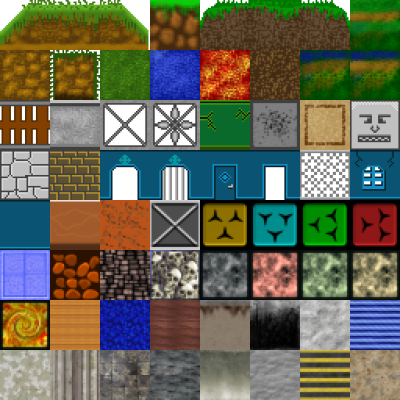
A texture atlas (also called a sprite sheet or an image sprite) is an image containing a collection of smaller images, usually packed together to reduce the atlas size.[1] Atlases can consist of uniformly-sized sub-images, or they can consist of images of varying dimensions.[1] A sub-image is drawn using custom texture coordinates to pick it out of the atlas. In an application where many small textures are used frequently, it is often more efficient to store the textures in a texture atlas which is treated as a single unit by the graphics hardware. Storing textures in an atlas reduces the overhead of a context switch by increasing memory locality. Careful alignment may be needed to avoid bleeding between sub textures when used with mipmapping and texture compression.
[https://en.wikipedia.org/wiki/Texture_atlas]
To configure a supplied texture atlas in the material use the provided properties:
| Property | Notice |
|---|---|
| AtlasRowCount | Defines the number of rows the texture atlas has. |
| AtlasColCount | Defines the number of columns the texture atlas has. |
| FrameWidth | Defines the width of each frame in pixels. The width has to be a potency of 2. For example: 16, 32, 64, 128, … |
| FrameHeight | Defines the height of each frame in pixels. The height has to be a potency of 2. For example: 16, 32, 64, 128, … |
Layered-Material
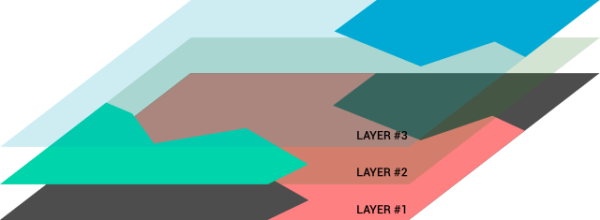
The TGorillaLayeredMaterialSource is a container of multiple sub materials. It works like a stack, where one material is rendered above another. The following schema visualizes this idea:

It is important that those sub materials do not clear the context, otherwise it will produce unexpected behaviour!
If the materials collection is empty, Gorilla3D will render the complete buffer with black color.
To setup sub-materials, simply add those to the material collection:
var LLayMat : TGorillaLayeredMaterialSource;
    LSubMat1 : TGorillaNormalMapMaterialSource;
    LSubMat2 : TGorillaPhongMaterialSource;
    LSubMatEntry : TGorillaLayeredMaterialItem;
[...]

// create the layered material source
LLayMat := TGorillaLayeredMaterialSource.Create(FGorilla);
LLayMat.Parent := FGorilla;

// create sub-material #1
LSubMat1 := TGorillaNormalMapMaterialSource.Create(FGorilla);
LSubMat1.Parent := FGorilla;

// add sub-material #1
LSubMatEntry := LLayMat.Materials.Add();
LSubMatEntry.Material := LSubMat1;

// create sub-material #2
LSubMat2 := TGorillaPhongMaterialSource.Create(FGorilla);
LSubMat2.Parent := FGorilla;

// add sub-material #2
LSubMatEntry := LLayMat.Materials.Add();
LSubMatEntry.Material := LSubMat2;
Shared-Material / Atlas-Material
Having games like Minecraft in mind, texturing seems very simple when using a single atlas texture. Working with FMX materials makes this a struggle. Because each time you create a material source and use the atlas texture, FMX will load the texture into the GPU. So if you're having an atlas with 8×8 parts, this will create 64 texture with the size of the original one. This is just horrible memory management.
That's not what we want. Gorilla3D offers a solution to you: SharedMaterialSource's! You set up a shared atlas material source once, where you load up your atlas texture. Than you only create referenced materials linked to that source. The reference material shader will use the global texture for rendering, instead of registering its own.

In the following example we have added 3 TGorillaAtlasMaterialSource instances from component palette before. We've set the “TextureIndex” property to an index of the sub-texture in our atlas (from left to right, up to down, beginning with 0). We have 3 cubes, to which we will apply the atlas materials. The shared source material will be created at runtime. (There is no design-time component yet!)
procedure TForm1.FormCreate(Sender: TObject);
var LTexFile : String;
begin
{$IFDEF MSWINDOWS}
  LTexFile := 'atlas.png';
{$ENDIF}
{$IFDEF ANDROID}
  LTexFile := IncludeTrailingPathDelimiter(TPath.GetHomePath()) + 'atlas.png';
{$ENDIF}

  /// lets create a source material
  /// It's used as texture container, which GorillaAtlasMaterialSourceX uses.
  /// This will only register the atlas texture once, instead of multiple times
  /// CAUTION: currently this is only available at runtime
  SharedAtlasSource := TGorillaSharedAtlasMaterialSource.Create(GorillaViewport1);
  SharedAtlasSource.Parent := GorillaViewport1;
  SharedAtlasSource.AtlasRowCount := 8;
  SharedAtlasSource.AtlasColCount := 8;
  SharedAtlasSource.FrameWidth := 32;
  SharedAtlasSource.FrameHeight := 32;
  SharedAtlasSource.Texture.LoadFromFile(LTexFile);

  // now link atlas materials to the source
  GorillaAtlasMaterialSource1.SharedSource := SharedAtlasSource;
  GorillaAtlasMaterialSource2.SharedSource := SharedAtlasSource;
  GorillaAtlasMaterialSource3.SharedSource := SharedAtlasSource;

  // now link to cubes
  GorillaCube1.MaterialSource := GorillaAtlasMaterialSource1;
  GorillaCube2.MaterialSource := GorillaAtlasMaterialSource2;
  GorillaCube3.MaterialSource := GorillaAtlasMaterialSource3;
end;
Grass-Material
Water-Material
Read more about water material on documentation about Water
Runtime Material
Read more about usage of Runtime Materials at RuntimeMaterial
Next step:: Primitives