Environment Mapping
In computer graphics, environment mapping,[1][2][3] or reflection mapping, is an efficient image-based lighting technique for approximating the appearance of a reflective surface by means of a precomputed texture. The texture is used to store the image of the distant environment surrounding the rendered object.
[…]
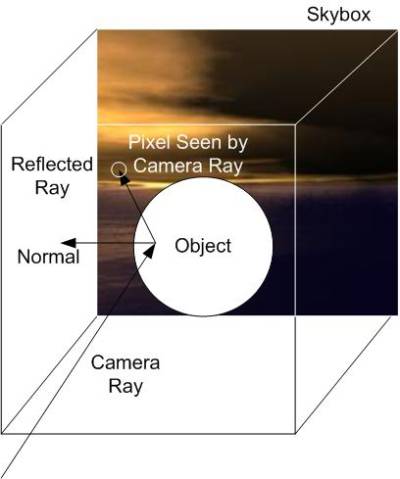
Reflection mapping is one of several approaches to reflection rendering, alongside e.g. screen space reflections or ray tracing which computes the exact reflection by tracing a ray of light and following its optical path. The reflection color used in the shading computation at a pixel is determined by calculating the reflection vector at the point on the object and mapping it to the texel in the environment map. This technique often produces results that are superficially similar to those generated by raytracing, but is less computationally expensive since the radiance value of the reflection comes from calculating the angles of incidence and reflection, followed by a texture lookup, rather than followed by tracing a ray against the scene geometry and computing the radiance of the ray, simplifying the GPU workload.
https://en.wikipedia.org/wiki/Reflection_mapping
Properties
| Property | Description | Available Since |
|---|---|---|
| MapSize | Set the size of the cubemap to pow(2, x), f.e. 32, 64, 128, 256, 512, 1024, 2048, 4096. A larger size means slower rendering. So change the value suitable to your scene. | |
| Position | Defines the center of the rendered cubemap represented by a virtual cube with a camera in the center. It is recommended to place it where the object is, which getting applied the environment map. | |
| IsDynamic | If this value is set to TRUE, the environment map is getting rendered each frame. If it is set to FALSE, it will only be rendered once. | |
| UseEmbeddedLight | Enable embedded light source for rendering. | 0.8.4.2346+ |
| CenterOffsetFront | Get or set the internal render point offset for front side rendering. | 0.8.4.2346+ |
| CenterOffsetBack | Get or set the internal render point offset for back side rendering. | 0.8.4.2346+ |
| CenterOffsetLeft | Get or set the internal render point offset for left side rendering. | 0.8.4.2346+ |
| CenterOffsetRight | Get or set the internal render point offset for right side rendering. | 0.8.4.2346+ |
| CenterOffsetTop | Get or set the internal render point offset for top side rendering. | 0.8.4.2346+ |
| CenterOffsetBottom | Get or set the internal render point offset for bottom side rendering. | 0.8.4.2346+ |
Dynamic Rendering
Depending on your scene you have to decide if dynamic rendering or rendering-once is the best option for you.
Rendering once might be suitable in many cases, especially when having not moving and unmodified objects. Because the scenery doesn't change, we do not have to re-render on each frame. Instead it's good enough to render at the beginning.
When your scene consists of many moving or changing objects it is mostly recommended to set IsDynamic property to TRUE.
When IsDynamic is activated, the scenery is getting rendered on each frame, which reduces performance a lot, because in fact it's getting rendered twice.
You can control the number of rendered objects by using AllowControl() or IgnoreControl() on your render-pass component, which can optimize rendering again.
But nevertheless you should be careful in using the IsDynamic property.
MapSize
Besides the dynamic rendering, the map size of our rendered environment map is very important for performance.
Simply said: A larger map size leads to less performance.
In most cases the environment map is not applied as fully visible reflection. This means we can build a low-resolution map for many scenes.
Working with low-resolution maps might look pixelated sometimes, but often it is not recognizable for users.
Embedded Light
The environment map render pass provides an embedded point light source by default, which can be turned on or off, in case you'll need an additional light source at the center position of your environment map.
Normally you will only use scene light sources, but in some setups it's very useful to cast light from the center of your environment map.
To do so just set “UseEmbeddedLight” to TRUE.
This light source will only be enabled for environment mapping rendering. It will not affect the regular scene rendering.
Center Offsets
The environment map render pass allows to manipulate the center position for rendering of all sides. Just modify the float value of the CenterOffset(Front|Back|Left|Right|Top|Bottom) property to offset camera position.
This is very useful when you want to bring reflective or refracting objects closer or further away.
Example
uses
  Gorilla.Controller.Passes.Environment;

var FEnvironment : TGorillaRenderPassEnvironment;

/// setup the render pass component and link it to your viewport
FEnvironment := TGorillaRenderPassEnvironment.Create(GorillaViewport1);
FEnvironment.Viewport := GorillaViewport1;

/// create a quite small environment is much faster
FEnvironment.MapSize  := 512;

/// position the environment cube at the position of your PBR object.
FEnvironment.Position := GorillaCube1.Position.Point;

/// create the environment once. To create it for each frame, set the value to TRUE.
FEnvironment.IsDynamic := false;